Consider this scenario: Everyone you know has an iPhone. You succumb to the peer pressure and not only buy a new iPhone, but eventually a MacBook. Problem is, you work on a Windows 10 device all day and the incoming text messages have you unlocking the iPhone every other minute. All that phone lifting interrupts your daily workflow. We show you how to text with iMessages on Windows 10 so your eyes stay glued to your PC.
Unfortunately, Apple doesn’t offer a cloud-based solution similar to Android where you can load up a webpage and respond to texts. In fact, iMessages is a closed system requiring an Apple device. But there is a way to respond to iMessages on a Windows 10 PC without having to lift the iPhone: Chrome Remote Desktop.
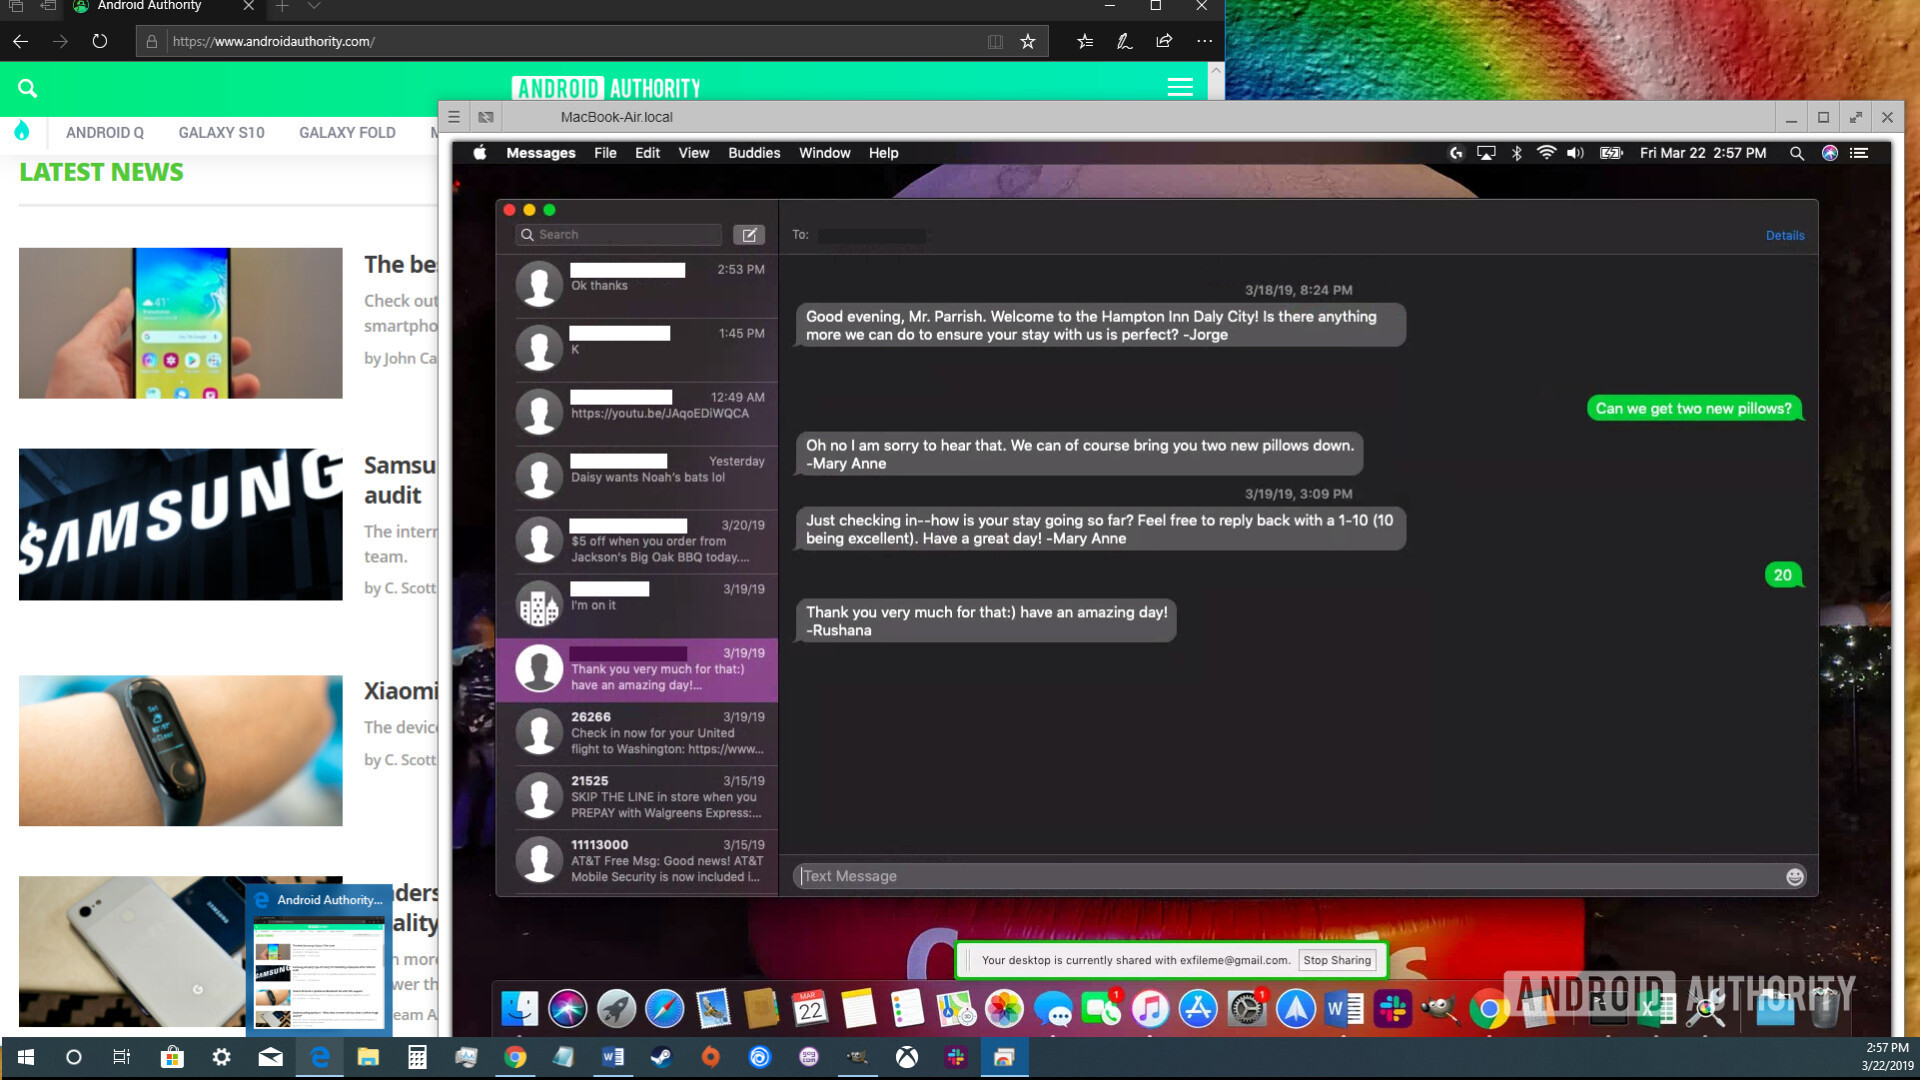
The setup we describe here uses an iPhone X as the source messaging device, a MacBook Air serving as the host PC, and a Windows 10 laptop as the client PC. The beauty here is that this method isn’t locked to just using iMessages. You can do mostly anything on your Mac using Chrome Remote Desktop, whether you’re checking email, installing apps from the App Mac Store, listening to music through iTunes, and more. Playing games, however, is not recommended.
That said, you have complete access to the Mac if Chrome Remote Desktop is running in the background. You don’t even need Google Chrome open on the Mac for this connection to work.
Let’s get started on how to text with iMessages on Windows 10!
Messages for iPhone

1. Open the Settings app.
2. Tap on your Apple ID account.
3. Tap iCloud.
4. Make sure Messages is toggled on (green).
Now let’s move on to the host MacOS device. In our example, we used a MacBook Air running MacOS 10.14.4 beta.
Messages for MacOS

1. Launch the Messages app from the dock, Launchpad, or desktop.
2. Sign in with your Apple ID and password. Enter a verification code if you have two-factor authentication activated.
3. Navigate to the app’s Menu bar, click Messages, and then select Preferences.
4. Select the iMessage tab in the pop-up panel.
5. Enable your account if needed.
6. Enable Messages in iCloud if needed.
7. Activate the phone number and email addresses where you can be reached.
8. Select or de-select Send read receipts.
9. Choose where you want new conversations to start (phone number or email address).
10. Click the Sync Now button.
Chrome for MacOS
With iMessages now up and running, the next step is to download Google Chrome for MacOS and the required components. We used Chrome 72 for MacOS in this guide.
1. Download Google Chrome.
2. Sign in to Google Chrome with your Google account.

3. Install the Chrome Remote Desktop extension. You may see a message requesting authorization.

4. Enter chrome://apps in the browser’s address bar and click on the Chrome Remote Desktop icon. You may need to scroll through several app pages to find it. Once located, you can hold the Control button while clicking on the icon to pull up a menu. Select Create Shortcut to add a shortcut on the MacOS desktop for quick access versus coming back to the apps page.

5. In the pop-up window, click the Get Started button in My Computers, then Enable remote connections.

6. Select Accept and Install to acquire the necessary host software.
7. In a pop-up window, select OK to download the Chrome Remote Desktop Host Installer.

8. Locate the downloaded chromeremotedesktop.dmg file and open it. This file contains the Chrome Remote Desktop Host package you need to install. Double-click on this package and follow the steps.
9. After installation, re-launch the Chrome Remote Desktop extension again.
10. Click the Enable remote connections button.

11. Create a PIN containing at least six digits. Re-enter your Mac’s password if prompted.

12. A pop-up window will appear stating remote connections are enabled.
With Chrome Remote Desktop up and running, make sure the Mac doesn’t go into sleep mode when idle. Navigate to System Preferences > Energy Saver and confirm that the Prevent computer from sleeping automatically when the display is off option is checked. The Wake for Wi-Fi network access option should be toggled on as well.
Now we move on to the Windows 10 client PC you will use to remotely access your MacOS host PC.
Windows 10
This is a shorter version of the MacOS setup that doesn’t require the host component.
1. Install Google Chrome if you haven’t already.
2. Sign in with your Google account.
3. Install the Chrome Remote Desktop extension from the Chrome Web Store.
4. After installation, enter chrome://apps in the address bar and click the Chrome Remote Desktop icon. You may need to scroll through several app pages to find the icon. Once located, you can right-click the icon and add a shortcut to your Windows 10 desktop so you don’t need to keep coming back to the apps page.
5. Click the Get started button found under My Computers.
6. The host MacOS machine should be visible on the list. Click on the MacBook.
7. Enter the PIN number you created on the MacBook.
BAM! You now have a window streaming your Mac’s desktop on Windows 10. You should also see a small box at the bottom of the Mac’s screen saying Your desktop is currently shared with (your email address) along with a Stop sharing button.
You can now remotely launch the Messages app and text through your iPhone via Windows 10.
Of course, if you plan on using your Windows 10 PC as a host in the future, you’ll need to click on the Enable remote connections button on the Chrome Remote Desktop screen. This will download and install the required host software provided by Google like we did with the Mac.
Again, you can do mostly anything on your Mac remotely from a Windows 10 PC. Even more, the Mac and Windows 10 PC don’t need to be on the same network as long as both have an internet connection and you’re logged into your Google account.
If you have issues, Google suggests the following:
1. Allow outbound traffic in your antivirus software.
2. Allow inbound UDP responses in youre antivirus software.
3. Open TCP ports 443 (HTTPS) and 5222 (XMPP).
4. Use the latest version of Chrome or Chrome OS.